Tips for Easier Home Electrical Wiring
Even if you have years of wiring experience, there are always a few tricks you may not know. We worked with two master electricians with decades of experience between them to glean their tips, tricks and techniques. From straightening cable to labeling wires, these tips will help you wire better, faster and neater.
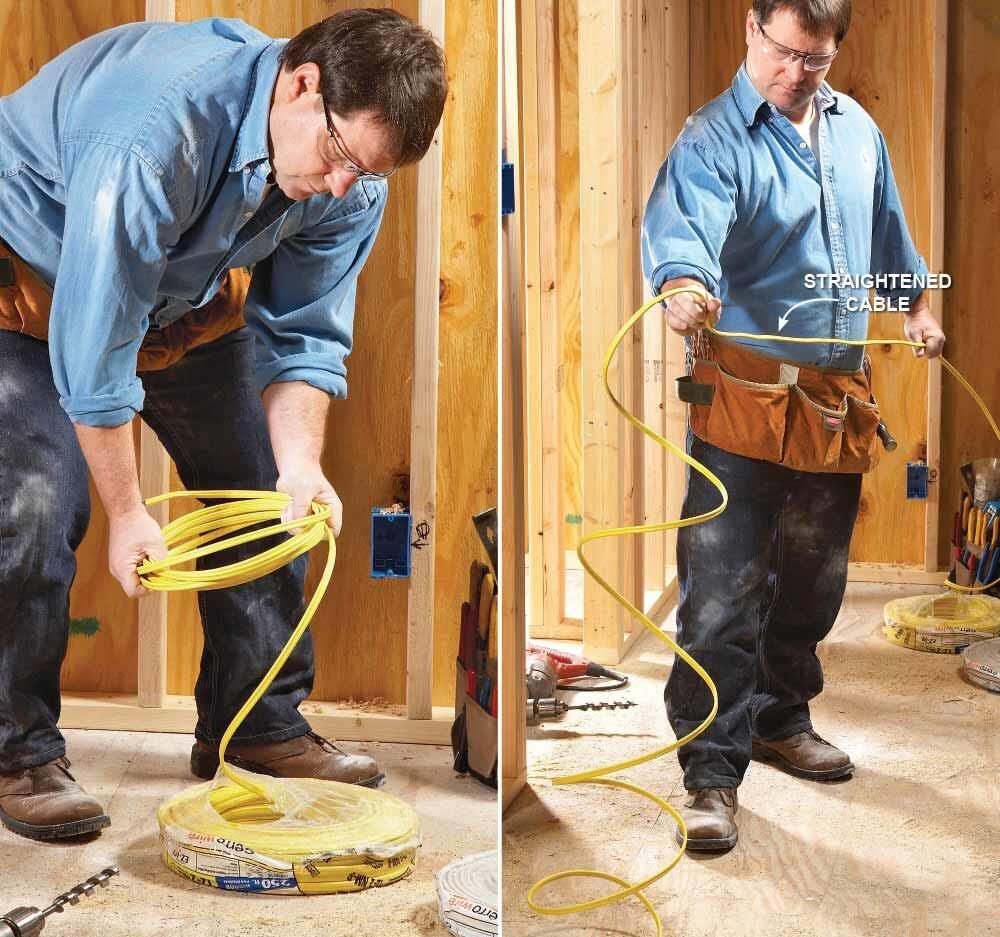
Uncoil Cable Without Kinks
Pulling plastic-sheathed cable through holes in the framing is a lot easier if you straighten the cable out first. If you simply pull the cable from the center of the coil, it’ll kink as you pull it through the studs. The trick is to lift a handful of coils (four loops will reach about 12 ft.) from the center of the roll (left) and toss them across the floor as if you’re throwing a coiled rope. Next, walk along the length of cable, straightening it as you go (right). The electricians we talked to prefer this method because they can keep the cable contained in the plastic wrapper for easier handling and neater storage.
Pack Electrical Boxes Neatly
If you’ve done much wiring, we’re sure you’ve had times when you could barely push the switch or outlet into the box because there were so many wires. The solution is to arrange the wires neatly and then fold them carefully into the box. Here’s how to keep wires neat and compact: First, gather all the bare ground wires along with a long pigtail and connect them. Fold them into the back of the box, leaving the pigtail extended. Next, do the same for the neutral wires. If you’re connecting switches as shown here, you don’t need a neutral pigtail. Leave the hot wire extra long and fold it back and forth across the bottom of the electrical wire box. Put a wire connector cap on the hot wire to identify it. The neatly packed box makes it easy to identify the wires and leaves you plenty of room for the switches.
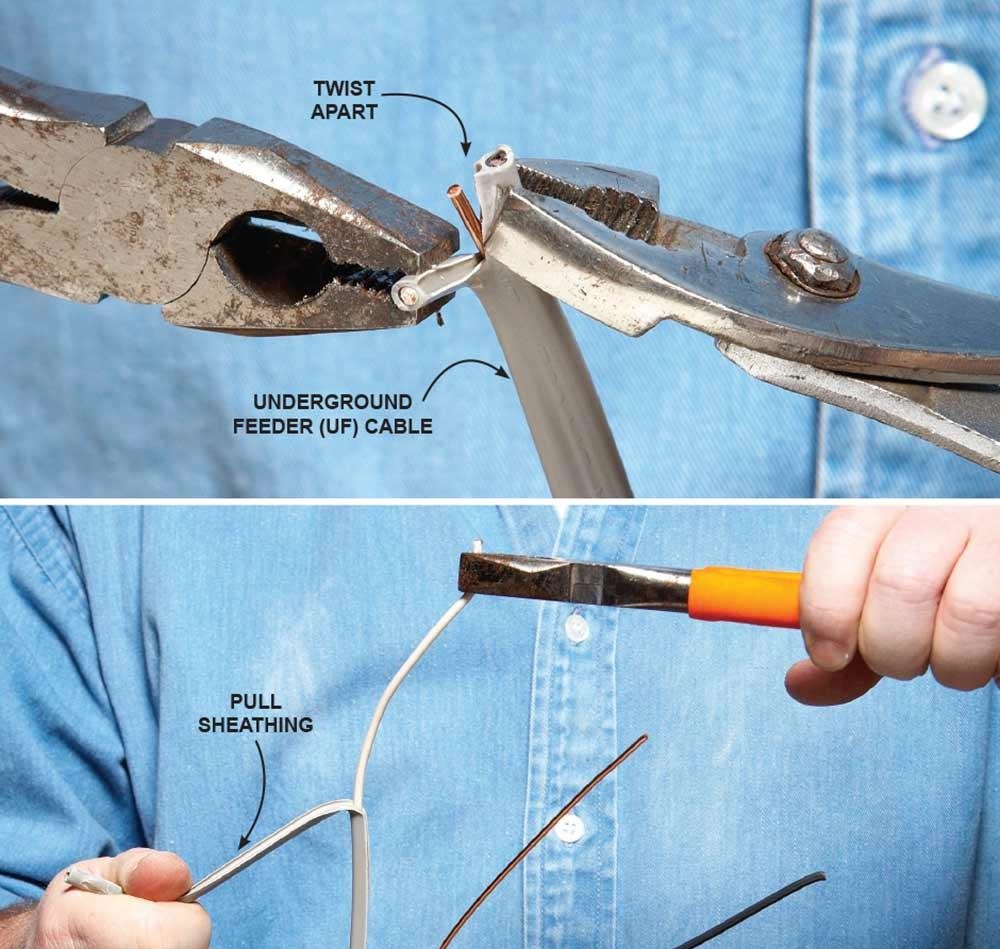
Remove Sheathing from Underground Feeder (UF) Cable
Underground feeder (UF) cable has a tough plastic sheathing that allows you to bury it directly in the ground without running it through a conduit (of course, it has to be buried deep enough to satisfy the electrical code). But that tough sheathing is also difficult to remove—unless you know this trick. Start by separating the black and white wires from the bare copper by grabbing each with pliers and twisting (top). They’re easy to tear apart once you get them started. Pull them apart until you have about a foot of separated wires. Next, remove the sheathing from the insulated wires by grabbing the end of the wire with one pliers and the sheathing with another pliers and working them apart. After you get the sheathing separated from the insulated wire at the top, just peel it off (bottom). Repeat the process to remove the sheathing from the black wire. Finally, cut off the loose sheathing with scissors or a knife.
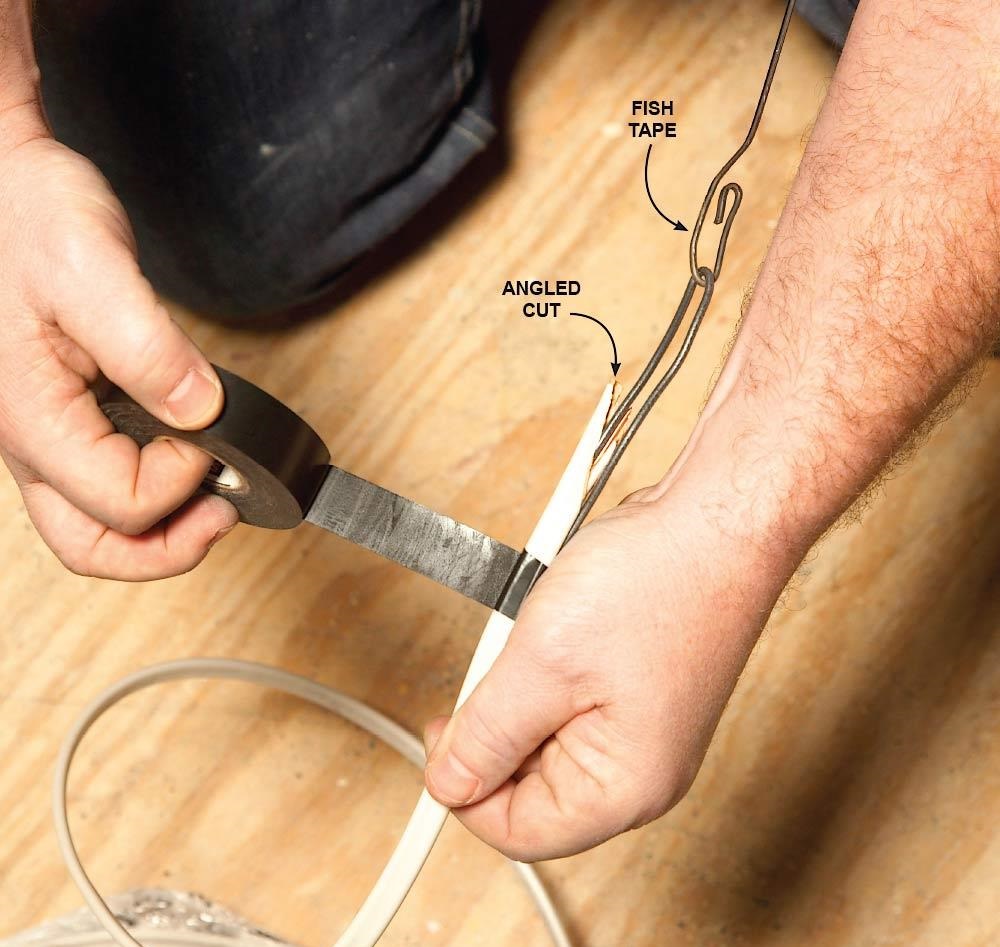
No-Snag Fish Tape Connections
After going to all the trouble of working your fish tape to its destination, the last thing you want is to lose the cable or get your tape stuck on something inside the wall as you pull it back. Here’s how to avoid both problems. Start by stripping an 8-in. length of cable. Using a side cutters, cut off all but one wire. Cut at a steep angle to avoid a “shoulder” that could catch on something. Then bend the single wire around the loop on the end of the fish tape and wrap the whole works with electrical tape to form a smooth bundle. Now you can pull the wire without worrying that it might fall off, and the smooth lump won’t get snagged by or stuck on obstructions.
Rewiring Tips
Approach the work with care
Rewiring needs a careful approach and, like all electrical installation work, is subject to regulation and legislation. Part P of the Buildings Regulations deals with electrical safety in domestic dwellings, and covers significant alterations and new additions (such as new kitchens and extensions) in UK homes.
Understand when rewiring is needed
Homes which have not been touched or rewired for over 20 to 30 years usually require attention. This is not only because the wiring is potentially dangerous but also because older wiring systems can’t cope with the demands of modern living.
Those runs of wires go everywhere: under floors, through walls and across ceilings, so first fix is best done without carpets or furniture, so floorboards can be lifted and ceilings cut into. To position new sockets and switches at legally correct heights, plaster generally needs to be chased into, too. This is why it’s important to plan what’s going where in each room before starting the first fix stage, so you know where you need lights, plug points and any other electrically driven items.
Avoid additions mid-way through
They are costly and time consuming. One way to avoid them is by drawing a plan of your home with each room on graph paper and marking up the position of beds, sofas, kitchen units and so on. You can then consider the lighting and switches required. Little things like under-cabinet and bedside lighting are easy to do when planned from the start, but costly to undertake later.
Think about futureproofing
Today we are a super-consuming society hooked on ‘tech’. In terms of electrics, this means mood lighting, surround sound, high-speed Wi-Fi, kitchen gadgets and TVs in the bathroom. Electrical circuits must be up to the job — and you need to plan ahead.
RENOVATION TIPS FOR FIRST TIME HOME OWNERS
When you have decided to take the plunge and upgrade your home there are a number of areas that will improve your ROI and even increase your home’s value. With everything from new appliances, new walls, paint and fixtures there are many smaller projects that can be completed quickly that will have dramatic effects. If you are not sure where to start, the kitchen, bathroom and basement will always yield the best return on your investment dollars – especially so if you choose energy-efficient and eco-friendly options. Plan carefully as smart choices will go a long way to recoup your money.
Once you have settled on what type of upgrades you wish to be completed the next task will be to locate a trusted local contractor. Before hiring an electrician or an electrical contractor to start your project there are a number of tips we can share to help you ease into the renovation, reduce your risk and improve your ROI – or get the best bang for buck
If you are planning a renovation and need some help understanding what to prioritize your safety with focus on your return on investment – give us a shout.
Tips to Increase Your Home’s Value
Plan your remodel.
Whether you just bought a house or you have lived there for a while, the fastest way to increase your home’s value is by making a plan.
You will fare better if upgrades are made intentionally and not on impulse. Home improvement projects cost about 20 to 25 cents on the dollar. The other 75 to 80 cents spent go directly back into the home through increased value.
Start slowly. It’s a marathon, not a sprint. If your home is new, get to know it. If you have already been there a while, get started. List the things you want to change and the updates you would like to make. Don’t worry about organization, just write it all down. Take a guess on how long you may want to live in the house. If you’re planning on selling, talk to your realtor and make a selling plan.
Tackle one room at a time.
How can you harness the energy that comes from new ideas and still be smart when you make those improvements? Make the commitment to tackle one room at a time. Whether it’s a simple coat of paint or knocking down a wall, by tackling one room at a time you keep projects achievable.
Make a list of all the things you dream about doing, break your list down into categories based on cost and write down how much time each project may take. What this does is help you get results. If you only have a day or a weekend, choose a project that fits within your timeframe, comfort level and financial commitment.
How to Avoid Rookie Remodeling Mistakes
Do all of the foundational and exterior work first.
It’s natural to want to move on to the next phase of your project, but ensure the house is sound before you begin interior work. That means replacing windows and putting on a new roof if needed.
This happened to us: On our most recent project, we added two decks to the back of the house. They were complete and sealed, but then water started to leak in: Water is a constant headache of old house life. We had to add a step as a water barrier and have the decks sealed again, and then again, before we were good to go inside.
No construction detail is too obvious.
When you’re functioning as the general contractor—or even working with a general contractor—you have to spell out every part of the plan, and never assume everyone is up to speed. Someone we know had a contractor demo the wrong bathroom.
Your prized possessions are another person’s trash: Label what stays and what goes where.
What you consider charming—a stained glass transom, original wallpaper, an old hall light—your crew may assume is being replaced. So make sure you are clear about what’s staying put. And take the time to spell out what goes where.
Create a spreadsheet of all your materials, fixtures, paint colors, and furnishings.
You’ll need to revisit these selections over and over again, to share and reshare with your GC and/or subcontractors. Start keeping a list of all the details from the get-go.